
CoConstruct uses the term Accounting Code to refer to those cost codes, item codes, products/services, or inventory items you use to manage income and expenses at the customer/project level. They play an essential role underlying the single-entry financial system in CoConstruct connecting everything together.
What? Accounting codes form the basis for job costing and allow you to classify your project costs to track how your estimate compares to the actual job costs. They have several key purposes:
- Track and organize job costs for your project
- Used in building your estimate, budget, change orders, invoices, and purchase orders
- Logging and tracking employee time in the Time Clock
Who? Any Admin builder user on your account has access to these settings.
Where? Get started with setting up your accounting codes by navigating to Settings > Accounting. Choose the tab for Accounting Codes to view your list, make edits, and add codes.
Accounting Code Anatomy
Your account comes pre-loaded with an example accounting code* that shows the basics of accounting code anatomy.
Code = An optional number or prefix associated with the code. If you want your accounting codes to sit in a particular order, use numbers to alphanumerically sort the list.
Description = A couple words or a phrase that details what this code is for. When you job cost, this description is handy for understanding where money has been allocated and expensed.
Note for QuickBooks Users: Consider placing the code + description portions together in the Code portion as QuickBooks sometimes only shows the code information.
Time Clock Activity = Whether a particular code should be used by team members when logging work hours on the Time Clock. Simply select which codes are relevant.
*Note: Once you’ve gotten your own codes in your account, feel free to deactivate/delete the example code.
THE PATH TO ADDING CODES
There are 3 ways you can set up accounting codes that largely depend on your previous system. The visual below highlights the various paths you can take to set up your codes.
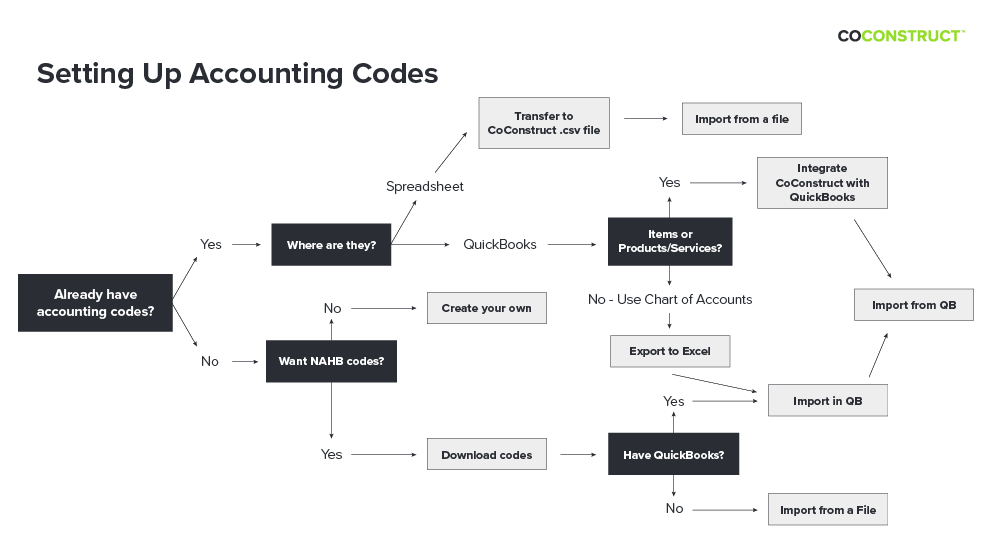
Follow the steps below to land on the instructions you’ll need. Or if you feel ready, jump directly to instructions on adding manually, importing a file, or importing from an accounting software.
STEP 1: Your Current Accounting Codes
First let’s consider the state of your current accounting codes. Do you have codes from a previous process you’d like to use in CoConstruct?
YES - I Have Accounting Codes
Wonderful! Whether these codes live in a spreadsheet or your accounting software, we can get them into CoConstruct. Where do your accounting codes live?
SPREADSHEET | ACCOUNTING SOFTWARE
NO - I Need Accounting Codes
No problem! Setting up at least a couple of accounting codes goes a long way towards obtaining insight into project job costs. Pro Tip: Successful job costing uses accounting codes that separate areas of labor from materials.
Interested in an example list of codes?
YES - Looking for Examples
See the attached file of the National Association of Home Builders (NAHB) accounting codes at the bottom of this article already built for importing into CoConstruct. Download the file of codes then pick and choose which codes you’d like for your job costing. Finally, before these codes land in CoConstruct, will you be integrating an accounting software like QuickBooks?
STEP 2: Working with an Accounting Software
CoConstruct integrates with a couple different accounting software programs to streamline your financial data. Regardless of which platform you leverage, you need accounting codes for the full job costing experience.
Codes Live in QuickBooks
When it comes to accounting codes specifically, let’s first discuss some important terminology. As the chart below displays, CoConstruct accounting codes equal different things depending on what accounting software you use. Why? We’re honestly not quite sure but the important thing to note here is even though codes have different names, they all equal the same thing.
CoConstruct = Accounting Codes
QBO = Products & Services
QBD =Item List
Do your codes live in one of these buckets?
YES - CLICK YOUR BUCKET | NO - SOMETHING DIFFERENT
YES - Ready to Integrate?
Perfect! From here, decide if you’re ready to integrate your accounting software with CoConstruct. Remember no information passes between CoConstruct and your accounting software without your permission.
Ready to Integrate?
Let’s do it! Start in your Accounting Settings and choose which software you’ll integrate with:
Connect CoConstruct to your company file and fill out the various drop-down fields on the Accounting Software tab. Save your changes!
Then after selecting your accounting software above, you're ready to import your codes.
Integrate Later
Thinking you might integrate down the road or just aren’t ready to think about integrating yet? No problem! You can still get accounting codes in CoConstruct and start job costing.
When You're Ready to Integrate:
- [Recommended] Mapping your codes
- Import your codes
Exporting Codes to Import
Whether you use the QuickBooks Chart of Accounts or just want to wait on integrating with CoConstruct, any codes not housed in the areas explained above need to make their way to the right place. Simply export your codes from your accounting software (most allow you to export them to Excel but you may have to copy and paste) and trim down any unnecessary codes.
Pro Tip: Successful job costing uses accounting codes that clearly, but concisely describe what the job cost bucket contains. If you used codes in your accounting software to build out estimates, many of your code descriptions may include lengthier scope of work details (ex. 3010 - Appliance allowance package to include a refrigerator, range/oven, microwave, and dishwasher…). Since CoConstruct offers specific text fields for scope of work on client estimates/proposals, consider trimming these descriptions down to the basics (ex. 3010 Appliance Package).
Exporting Items from QuickBooks Desktop

- Select Lists from the top menu
- Choose Item List from the drop down
- At the bottom of your Item list, click the drop down arrow next to Excel and select Export All Items
- On the export window, choose Create a comma separated values (.csv) file
- Select Export
Exporting Products/Services from QuickBooks Online

- Select Sales from the side panel
- Choose Products and Services from the drop down menu
- Use the Export Icon on the page to export to a spreadsheet
Exporting Chart of Accounts from QuickBooks Desktop
- Select Lists from the top menu
- Choose Chart of Accounts from the drop down
- From the Reports option at the bottom, select Account Listing
- Use the Excel function to Create New Worksheet
- Choose Create a comma separated values (.csv) file option then select Export
Exporting Chart of Accounts from QuickBooks Online
- Select Accounting from the side panel
- Choose Chart of Accounts from the drop down
- Use the Run Report option to generate a full list of the accounts
- Select the Export icon and choose Export to Excel
Consider next where these codes need to go:
DIRECTLY INTO COCONSTRUCT | BACK INTO QUICKBOOKS TO INTEGRATE
Importing Codes to Your Accounting Software
Now that you have the accounting codes you need, let’s get them into your accounting software so you have everything ready to flow together. In addition to the code and description CoConstruct will translate for an accounting code, your accounting software requires these to link to corresponding income and expense accounts. Reference detailed instructions on this process before continuing.
Once complete, you're ready to integrate with CoConstruct.
THE STEPS TO ADDING CODES
There are 3 ways you can set up accounting codes.
I. Adding Manually
When to Add Manually
- You have just one or a few codes to add to the system
- You have a list of your own codes outside of CoConstruct you’d like to add
To add codes manually to your account:
- Select + New
- Fill out information about the Code and Description
- Click OK to add the code
- Repeat for all additional codes
II. Adding From a File
When to Add From a File
- You have accounting codes on a spreadsheet outside of CoConstruct
- You won’t be integrating with an accounting software
- You plan to integrate with your accounting software later but want to get started with job costing and/or other financial areas of your account
- You have cost codes from Xero to use for job costing and budgeting
- You want to import the NAHB accounting codes attached to this article (Note: we gave this to you already in the right format for importing to CoConstruct so skip steps 2-4!)
To import codes from a file:
- Select Import, and if a drop down appears choose from a file
- Download the import .csv file to your computer
- Copy/Paste or enter in your codes to the appropriate columns
- Save the file (keeping the format as .csv)
- Back in CoConstruct on the Import from a File window, choose Select File to pull in the list of codes
- CoConstruct will validate the list
- Select Import if all looks good
Pro Tip: Leading Zeros in Spreadsheets
Many spreadsheet softwares, like Excel, often hide leading 0s on numbers. If your accounting code list has codes with 0s in front to ensure proper ordering, you may find these disappear when entered on the import .csv file. Without them, your accounting code will resort alphanumerically, moving these codes further down your list. To force recognition of these leading 0s, put a single quote mark (‘) in front of the 0s. For example, your spreadsheet converts the code 0015 to just 15 so type out ‘0015 to keep the right format. CoConstruct will ignore these and import your codes correctly!
III. Importing From an Accounting Software

When to Import from an Accounting Software
- You have accounting codes in QuickBooks or Xero and need them in CoConstruct
- You have integrated your company file with CoConstruct
- You already have codes set up in CoConstruct that need to be mapped to a QuickBooks or Xero equivalent
- You need to bring in new accounting codes added to your accounting software
To import codes from an accounting software:
- Select Import
- Choose the option from QuickBooks or from Xero as applicable
- A CoConstruct accounting code will be created for every instance of an imported code
Mapping Existing Accounting Codes
Already have accounting codes in CoConstruct to match with your accounting software codes? First consider how the accounting codes in CoConstruct compare* to those in your accounting software.
Exact Match Required: Does every accounting code in CoConstruct match letter by letter to those in the accounting software? If there is any risk that a code in CoConstruct does not match the accounting software equivalent, an import risks creating a duplicate entry. Any accounting codes that have already been entered in CoConstruct will be linked to the corresponding codes from your accounting software. In order for the existing codes to match during the import process, they must be entered exactly the same between the two systems.
*Note: A CoConstruct accounting code does not need to exactly match the corresponding accounting software code for financial data to sync. If you prefer for CoConstruct to say one thing and map it to another, go for it!
To prevent any risk of duplicate accounting codes, manually match up the accounting codes between the two systems. While a more manual and time consuming process, this only needs to be done once.
To manually map accounting codes:
- Select an accounting code to open its details
- Use the QuickBooks Item or QuickBooks Product/Service or Xero drop down to select the corresponding matching code
- Click OK to save your changes
- Repeat until all codes are mapped
Note: Codes already mapped will get greyed out as you go.
Need additional help setting up accounting codes? Contact support.